MORE TOOLS – SLIP AND SLIDE
These two tools can also be quite useful, particularly if you have a long project with multiple audio tracks and you don’t want to bump anything out of sync or when you’re first roughing your sequence together.
-- The SLIP edit does NOT change the clip’s placement in the timeline. It does not change the DURATION of the clip and it does not change the DURATION of the timeline. It merely alters what PORTION of a given clip is being used. This is helpful if you like the placement of all your clips, but want to use a different section of a certain clip.
It doesn’t affect ANY of the clips around it.
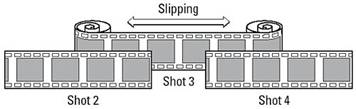
When you use the SLIP TOOL, you’ll notice that the CANVAS window will turn into a dual display which is showing you which frame is going to be the FIRST one in the clip and what frame will be the LAST one in the clip.
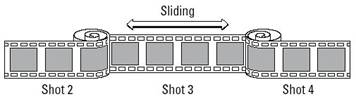
-- The SLIDE, on the other hand, WILL affect the clips around it, but still leaves the DURATION of the selected clip and the DURATION of the entire sequence alone.
The SLIDE tool moves a clip in one piece up and down the Timeline while adding or subtracting frames from the clips around it to keep the entire timeline in one piece. This can be helpful when you want to sync a single clip with audio without affecting the sync of the clips adjacent to it.
FORWARD TO PAGE 3 - Preparing to Capture Footage
02 – Slip & Slide |
|||